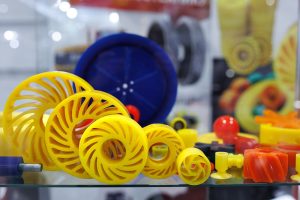
You have a design ready. You need 20 parts that look and feel like the finished product, not 20 rough prototypes. Injection moulding is too expensive for that volume. 3D printing won’t give you the surface finish you need. CNC machining 20 identical parts would take longer than it should.
This is the gap vacuum casting fills.
Most guides on the process explain what it is but skip the harder question of when to actually use it. This article walks through what the vacuum casting process involves, what it produces, and how to decide whether it fits your project or whether another method would serve you better.
What Vacuum Casting Actually Is
Vacuum casting is a low-volume manufacturing method that uses a silicone mould to produce plastic or rubber parts from liquid polyurethane resin. The resin is poured into the mould inside a vacuum chamber, which pulls out trapped air and forces the material into every corner of the cavity.
Three things make it work. A master pattern is the original shape you want to copy. A silicone mould is made from that pattern. A two-part polyurethane resin fills the mould. The vacuum is what separates the process from simpler pouring methods. Without it, you get bubbles, patchy detail, and unusable parts.
How the Vacuum Casting Process Works, Step by Step
The process breaks down into three main stages. Each one matters, and the quality of the earlier stages carries through to the finished part.
Making the Master Pattern
Every silicone mould starts with a master pattern. This is a physical version of the part you want to reproduce, usually made by SLA 3D printing or CNC machining. Both methods produce a smooth, dimensionally accurate original that the mould can copy faithfully.
The master decides the quality of everything that follows. A rough master gives you rough parts. A polished, precise master gives you parts that could pass for injection moulded components.
Building the Silicone Mould
The master is suspended in a casting box and liquid silicone is poured around it. After curing in an oven for several hours, the silicone sets into a flexible block. The mould is then carefully cut open along planned seam lines, the master is removed, and the cavity left behind is the negative shape of your part.
Because silicone is flexible, it releases parts with undercuts and complex features that rigid tools would struggle with.
Casting the Parts
The polyurethane resin is mixed with any pigments or additives, degassed, and poured into the sealed mould inside a vacuum chamber. The chamber removes air bubbles as the resin flows. The filled mould goes into a heated oven to cure, then the part is demoulded and finished.
The same mould is reused for the next casting. Most silicone moulds produce between 20 and 30 usable parts before the surface degrades and the mould is replaced.
What You Can Actually Make With Vacuum Casting
The vacuum casting process is more flexible than most people realise. Modern polyurethane resins can mimic a wide range of engineering plastics and rubbers, so you can produce parts that look, feel, and perform close to the final production version.
Common material options include:
- Rigid polyurethanes that simulate ABS, polypropylene, or polycarbonate
- Flexible elastomers with Shore hardness from around 10 to 85 A, useful for seals, grips, and soft-touch components
- Clear resins for lenses, covers, and display components
- Flame retardant grades for safety-critical applications
- Food-grade resins for consumer product testing
- Glass-filled resins for extra strength
You can also cast around metal inserts, produce two-material parts through overmoulding, and apply a range of surface finishes from matte and textured through to high gloss.
When Vacuum Casting Is the Right Choice
The vacuum casting process fits best when four conditions line up. You need mid-range volumes, production-quality appearance, complex geometry, and a design that isn’t ready for hard tooling yet.
Volumes Between 10 and 100 Parts
This is the volume sweet spot. Below 10 parts, 3D printing is usually faster and cheaper. Above 200 parts, injection moulding starts to make sense on a per-unit basis. Between those numbers, vacuum casting is often the most sensible route.
Because a single silicone mould produces 20 to 30 parts, larger runs use additional moulds cast from the same master.
When Surface Finish and Feel Matter
If your parts are going in front of clients, investors, or focus groups, appearance counts. Vacuum cast parts have a smooth, uniform surface that looks and feels like a finished product rather than a prototype. That makes them a strong fit for marketing samples, exhibition models, pre-production reviews, and pilot runs.
Bridge Production Before Committing to Tooling
Steel injection moulds can cost anywhere from around £5,000 to £50,000 or more, and take weeks to produce. If your design might still change, or if you want to test the market before that investment, vacuum casting gives you real, functional parts at a fraction of the tooling cost. Once the design is locked and volumes grow, you move to injection moulding with confidence.
Complex Geometries and Undercuts
Flexible silicone moulds release shapes that rigid metal tools struggle with, including deep undercuts, internal features, and fine surface textures. Combined with the vacuum step, which pushes resin into every part of the cavity, this makes vacuum casting a strong choice for intricate designs.
When to Choose Something Else
 Not every project suits vacuum casting. Being honest about this saves time and budget.
CNC Machining
If you need high-strength engineering components, tight tolerances in metal, or one-off precision parts, CNC machining is the better answer. It also handles materials that vacuum casting can’t, including aluminium, brass, and steel. For high-accuracy prototypes made from mill-certified engineering alloys, CNC machining is the benchmark.
3D Printing
For one or two parts, or when you’re still iterating quickly on a design, 3D printing is faster and cheaper. It also handles geometries that no mould could release, including internal lattices and enclosed voids. Once the design settles and you need multiple parts with a better finish, that’s the point to switch to vacuum casting.
Injection Moulding
For hundreds or thousands of identical parts, injection moulding wins on unit cost, tolerance consistency, and material range. The trade-off is the upfront tooling cost and lead time. Vacuum casting is often used as a stepping stone before this investment.
Common Myths About Vacuum Casting
A few myths follow the vacuum casting process around, and they trip up first-time buyers.
Myth one: it’s only for prototypes. Vacuum casting is regularly used for low-volume end-use parts, especially in medical, automotive, and consumer product sectors where runs of 50 to 200 make injection moulding uneconomic.
Myth two: it’s the same as injection moulding. It isn’t. Injection moulding uses hard metal tools that last for tens of thousands of parts. Vacuum casting uses soft silicone moulds that wear after 20 to 30 casts. The processes look similar in a diagram but serve different volumes and price points.
Myth three: it’s slow. Typical lead times are around 7 to 10 days from master pattern to finished parts, and shorter timelines are possible with the right workshop. If your supplier has 3D printing, CNC, and casting in one place, you cut out the delays that come from shuttling work between vendors.
What Affects Cost and Timeline
Four factors move the numbers on any vacuum casting job:
- Part complexity and size, which determine mould difficulty and cure times
- Total quantity, since larger runs need multiple moulds
- Material choice and any special finishes or additives
- The method used for the master pattern, with 3D printing usually the fastest option
A small, simple part in a standard rigid resin can be quoted and produced in under a week. A large, multi-material assembly with a bespoke finish will take longer and cost more, but still far less than tooling up for injection moulding.
How JH May Approaches Vacuum Casting
We’ve been running vacuum casting jobs for over 30 years, and the reason projects move quickly through our workshop is that every stage happens in one place. Our SolidWorks design team, rapid prototyping equipment, CNC machines, casting ovens, and paint shop all sit within the same building in Essex.
When a client sends over a CAD file, we produce the master pattern in-house, build the silicone mould, cast the parts, and finish them without waiting on external suppliers between stages. That integration is why we turn round work in days that would take other suppliers weeks. It also means we can adjust course quickly if a design needs a tweak between the master and the cast.
We work across sectors, from product design and shop display through to industrial and exhibition models, and we handle everything from small precision components to large assemblies.
Making the Right Call for Your Project
The decision usually comes down to a short set of questions. How many parts do you need? What do they need to look and feel like? How settled is the design? What’s your timeline?
If you need somewhere between 10 and 100 parts, want them to look like finished products, have complex features that would fight a rigid mould, and aren’t ready to commit to steel tooling, vacuum casting is almost certainly the right answer. For anything at the extremes, one-off precision parts or full production runs, another method will serve you better.
The quickest way to check is to send a CAD file and a target quantity to a workshop that runs the process in-house. A good supplier will tell you honestly whether vacuum casting fits or whether another method would suit you better. If you’d like us to take a look at yours, get in touch and we’ll come back to you with a straight answer.
Frequently Asked Questions
How many parts can one silicone mould produce?
Most silicone moulds produce 20 to 30 usable parts before the surface starts to degrade. Larger runs use additional moulds cast from the same master pattern.
What tolerances can vacuum casting hold?
Typical tolerances are around ±0.1 to ±0.3mm, with shrinkage of roughly 0.3%. Tighter tolerances are achievable on smaller features with careful mould design and, where needed, metal inserts in critical areas.
How long does vacuum casting take from start to finish?
A typical job runs 7 to 10 days from master pattern to finished parts. Faster turnarounds are possible when the master, mould, and casting all happen at the same workshop.
Can vacuum cast parts be used as final products?
Yes. Vacuum casting is regularly used for low-volume end-use parts across medical, automotive, and consumer product sectors, particularly for runs of 50 to 200 units.
Is vacuum casting cheaper than injection moulding?
For low volumes, yes, by a wide margin. Injection mould tooling can run from around £5,000 to £50,000 or more, whereas a silicone mould costs a small fraction of that. Once volumes reach the thousands, injection moulding becomes cheaper per part.